How to Add Mailchimp to Wix: Step-by-Step Integration Guide
Learn how to add Mailchimp to Wix using step-by-step methods for account integration, signup forms, popups, DNS authentication, and contact syncing to improve email marketing, automation, and subscriber management.
Having trouble adding Mailchimp to a Wix website? Here’s how to do it:
Go to the Mailchimp integrations page, connect your Wix account, select the contact types you want to sync, map your audience fields, and click Sync Now. You can also embed Mailchimp signup forms using HTML code in the Wix Editor, add a popup through Tracking & Analytics, or install a Mailchimp app from the Wix App Market.
Whether you are a site owner managing your own email list or a developer handling client projects, connecting Mailchimp to Wix unlocks serious email marketing power. Automation workflows, behavioral targeting, predictive segmentation, multi-channel marketing campaigns across email and SMS messaging, and AI-powered content tools become available the moment your accounts are linked.
Below, we cover every working method to add Mailchimp to your Wix website so you can pick the one that fits your setup and get it done quickly.
What You Need Before Connecting Mailchimp to Wix
Before you start, make sure you have these essentials ready. A Wix account (free works for embedding forms; some third-party App Market integrations may require a paid app subscription or a premium Wix plan for full functionality), a Mailchimp account (the free tier supports a limited number of contacts and monthly sends; check Mailchimp's pricing page for current limits), and admin access to both platforms.
Quick context: Wix has its own built-in email marketing tool. It handles basic email campaigns and works natively inside the Wix dashboard. But most users searching for this integration have already decided that Mailchimp, built by Intuit Mailchimp, meets their needs. That could be advanced automation flows, a visual workflow builder, send time optimization, A/B testing, SMS marketing, or deeper analytics dashboard insights.
If that is you, let us get into it.
How to Add Mailchimp to Wix Using the Official Integration
Mailchimp currently provides an official Wix integration for eligible accounts. This is the most complete method when available. It syncs your Wix contacts, customer data, and site interactions directly into your Mailchimp list. No code, no third-party tools. Here is the setup.
Connect Your Wix and Mailchimp Accounts
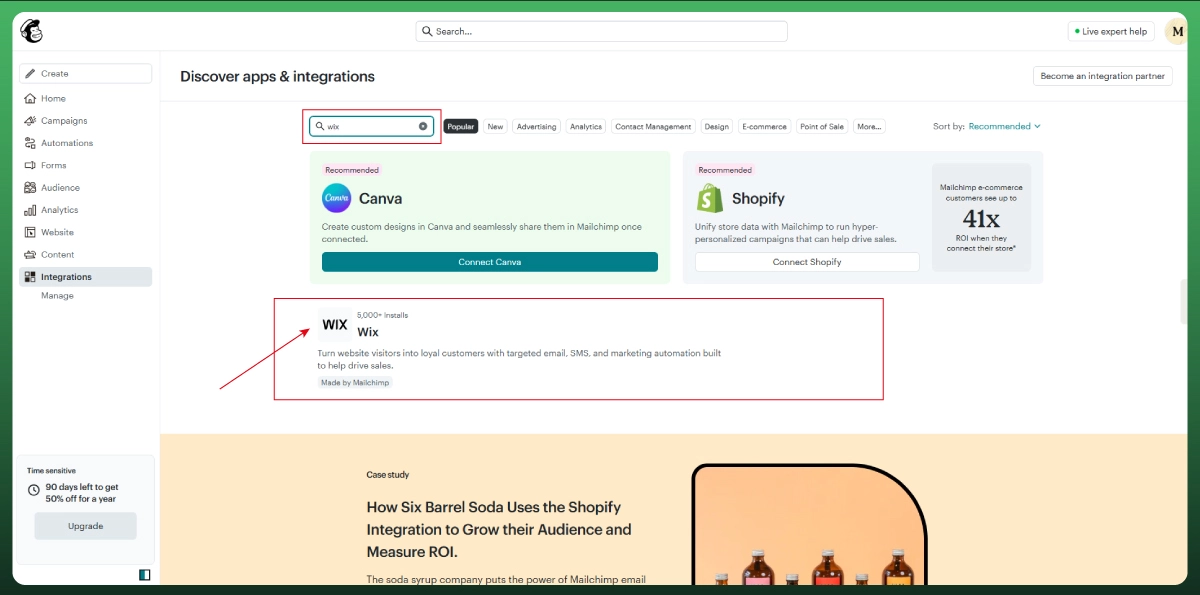
1. Log in to your Mailchimp account and go to Integrations. Search for Wix and open the Mailchimp for Wix integration page.
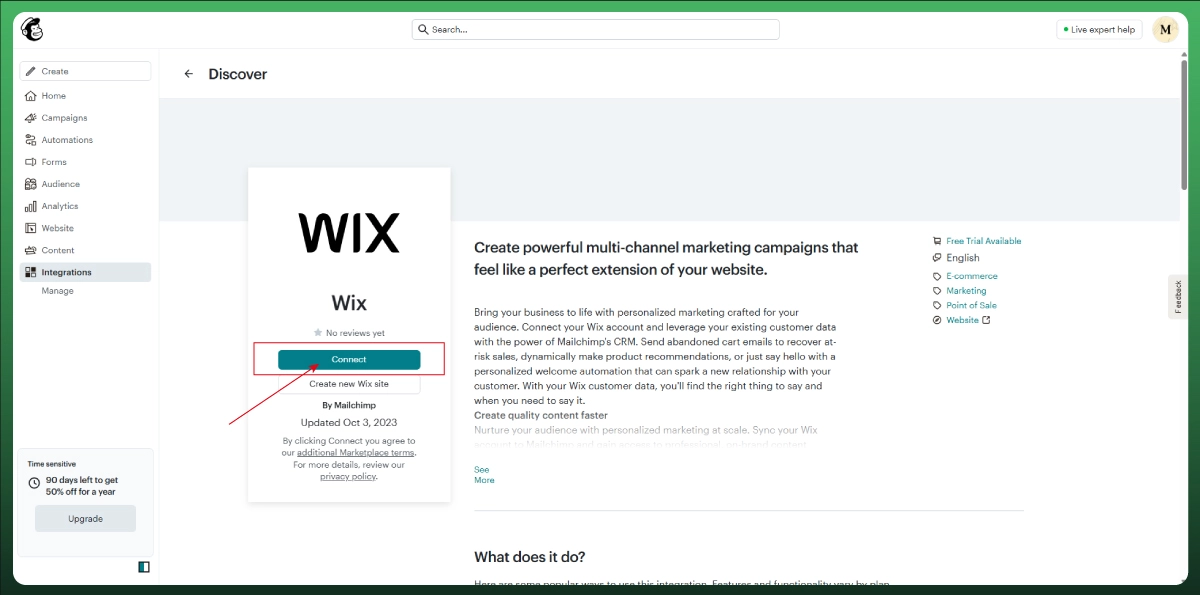
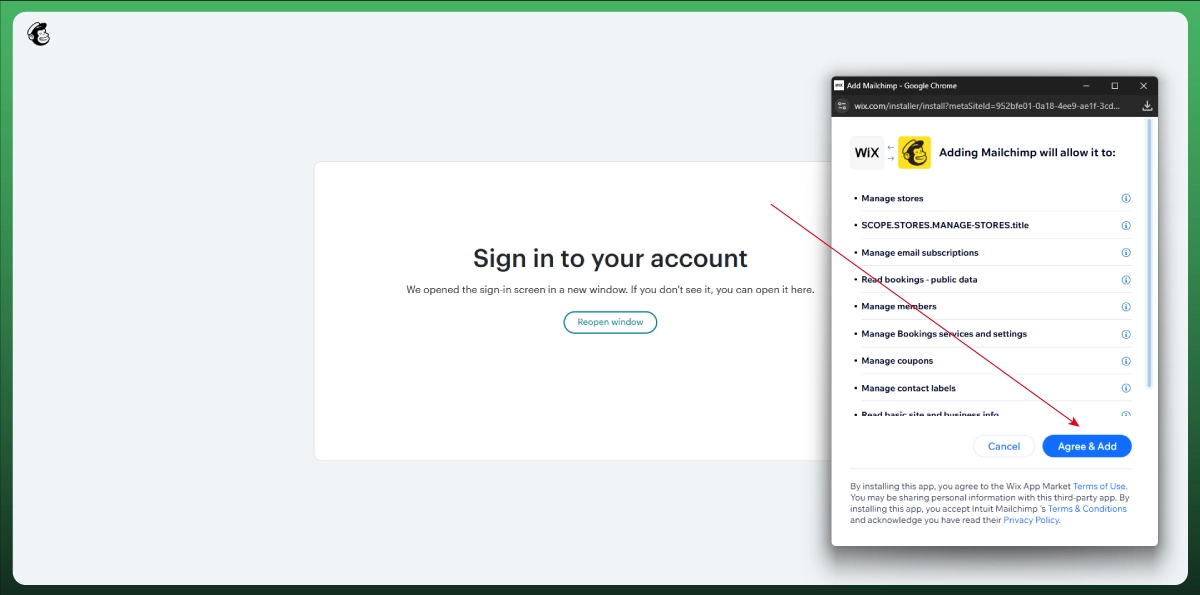
2. Click Connect, then Continue on the pop-up modal to begin the connection process.
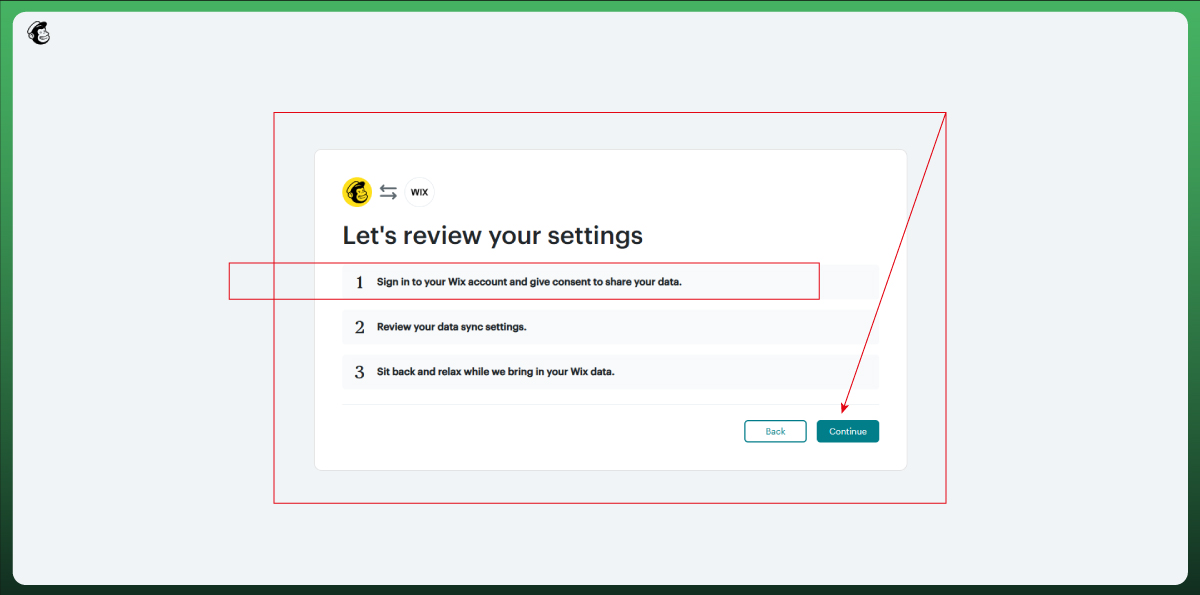
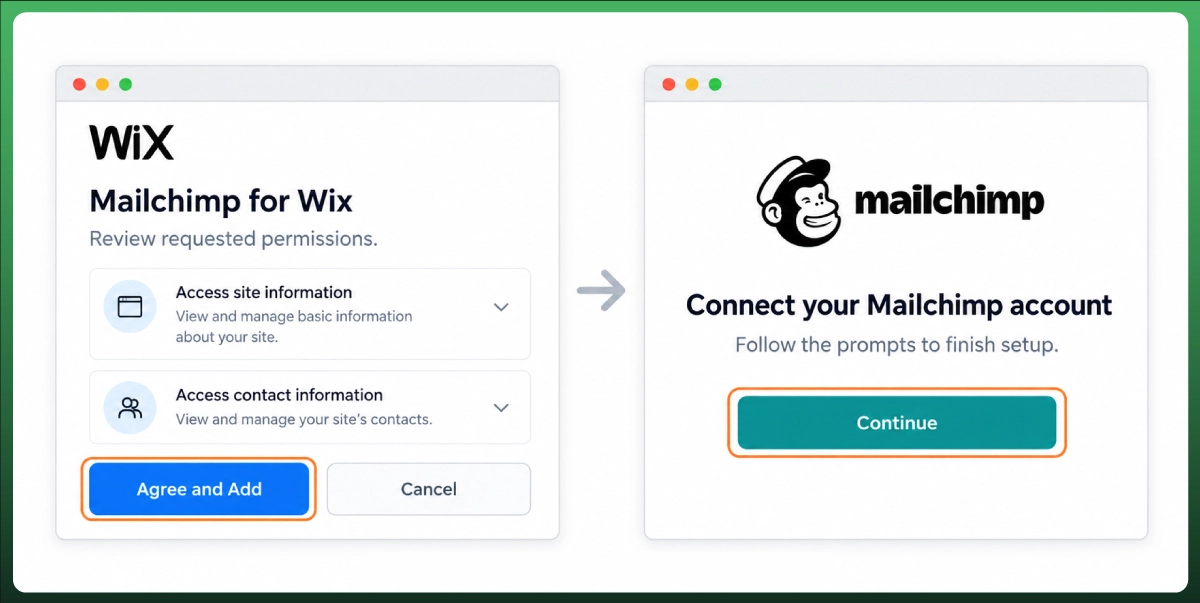
3. Sign in to your Wix account when prompted. If you don't have one yet, click Sign Up to create it. Review the permissions Mailchimp is requesting and click Agree and Add.
4. Click Continue to connect your Mailchimp account. Sign in if prompted.
5. Both accounts are now linked. Mailchimp will ask you to configure your data sync next.
This method works for Wix e-commerce stores, blogs, portfolios, and standard websites. Once connected, the sync runs automatically, so your Wix contacts and Mailchimp subscribers stay updated without manual effort.
Choose Which Contacts and Data to Sync
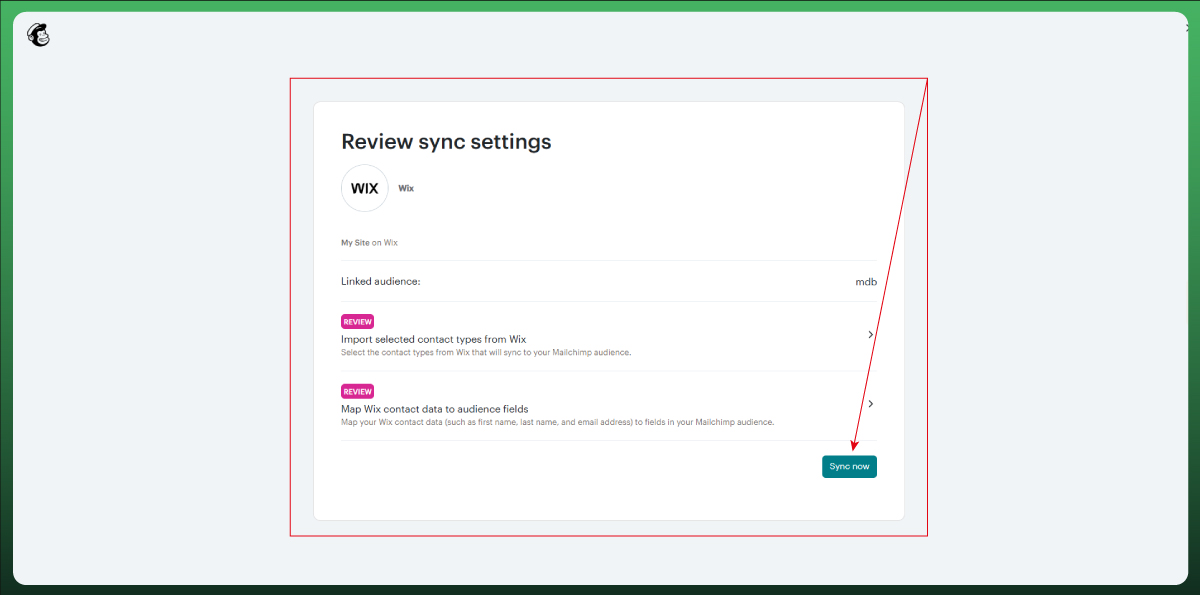
After connecting, click "Importing all contact types from Wix" and choose which contact types to sync. Your options typically include site members, customers (for Wix e-commerce), email subscribers, and new contact form submissions.
Be selective here. Mailchimp's pricing is based on the total number of contacts. Syncing every contact type can push you into a higher billing tier fast. If your goal is lead generation through newsletter signups, you probably only need subscribers and new customers. Uncheck the rest and click Save.
Map Your Wix Data to Mailchimp Audience Fields
Click "Mapping Wix data to default audience fields" to review how your Wix data flows into Mailchimp. The default mapping covers basics like name, email address, and phone number.
If you have custom fields in Wix (company name, order value, membership type), map them to the corresponding Mailchimp audience fields. This mapping powers your personalized campaigns later, because Mailchimp's segmentation tools can filter audiences by any mapped field.
Click Save, then Sync Now. Your dashboard will display the sync status and a breakdown of what data transferred. You can review this anytime under Manage Integration.
How to Add a Mailchimp Signup Form to Wix
If you don't need a full data sync and just want to collect email addresses from visitors, embedding a Mailchimp signup form is the fastest route. This method works for contact collection on any page, whether it is a landing page, blog sidebar, or footer.
Generate Your Form Code in Mailchimp
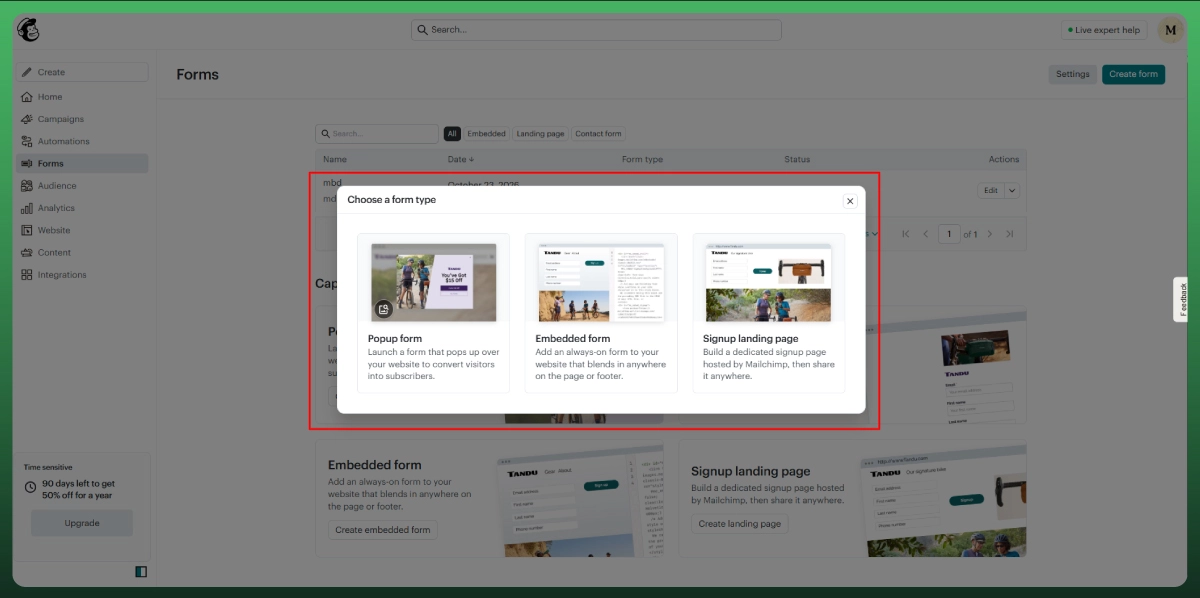
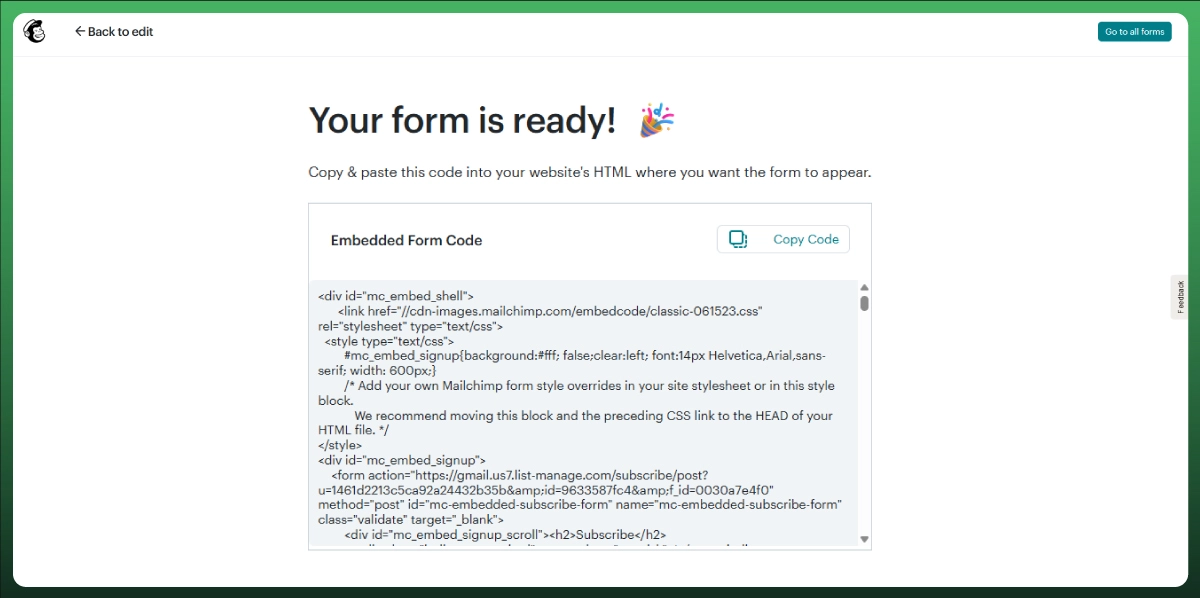
1. In Mailchimp, go to Audience, then Signup Forms, then Embedded forms.
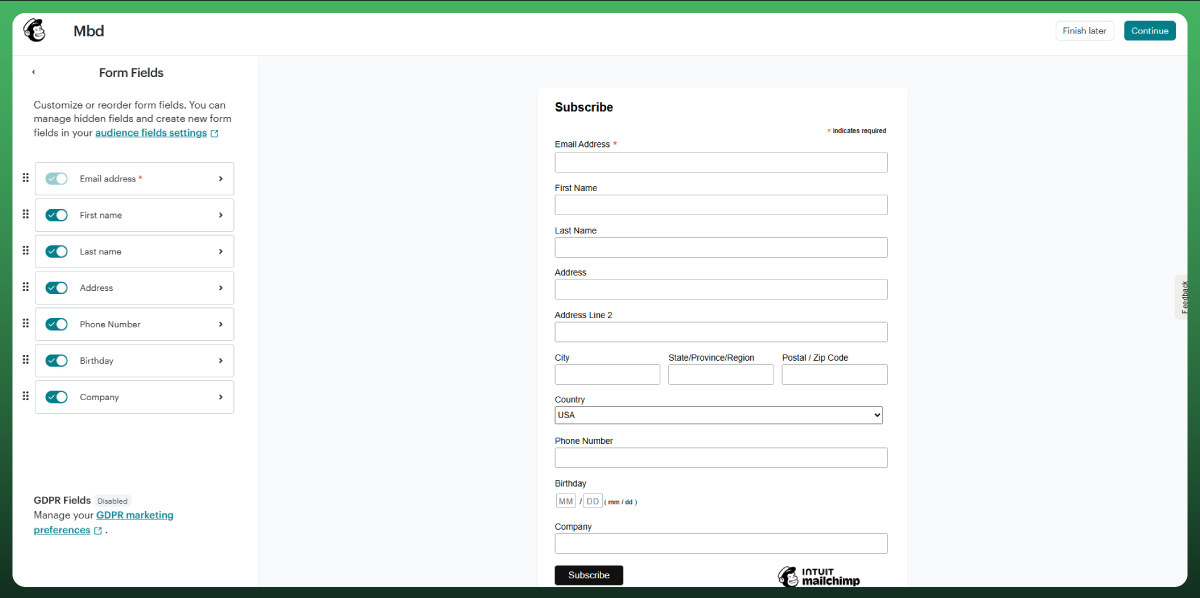
2. Choose your form style. Classic works well for most sites. Condensed fits better in sidebars or narrow sections.
3. Customize the fields. At minimum, keep email. Add first name if you plan to use personalized messaging in your email campaigns.
4. Copy the HTML code from the code block below the form preview.
The generated code is self-contained. It includes the form structure, basic styling, and the submission endpoint. No API key is required to add Mailchimp code to Wix this way.
Embed the Mailchimp Form on Your Wix Site
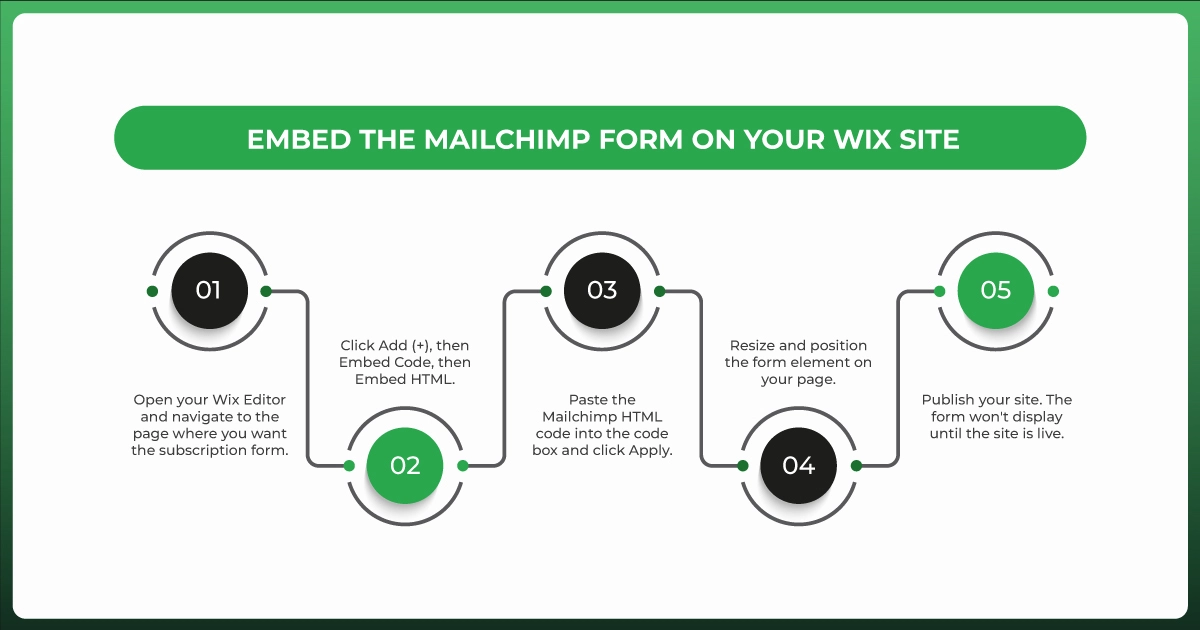
Open your Wix Editor and navigate to the page where you want the subscription form.
Click Add (+), then Embed Code, then Embed HTML.
Paste the Mailchimp HTML code into the code box and click Apply.
Resize and position the form element on your page.
Publish your site. The form won't display until the site is live.
One styling note: Mailchimp's embedded forms use their own CSS, which may clash with your Wix theme. Switch to the "Unstyled" option in Mailchimp's form builder if the default look feels off, and style it through Wix's embed settings instead.
New subscribers who fill out this form go straight into your Mailchimp list without any Wix-side data sync.
How to Add a Mailchimp Popup to Wix
Popup integration is one of the most requested features for Mailchimp on Wix, and also one of the trickiest to get working. Popups are great for catching visitors with a discount coupon offer, free giveaway, or simple newsletter signup. Here is what actually works.
Set Up the Popup in Mailchimp
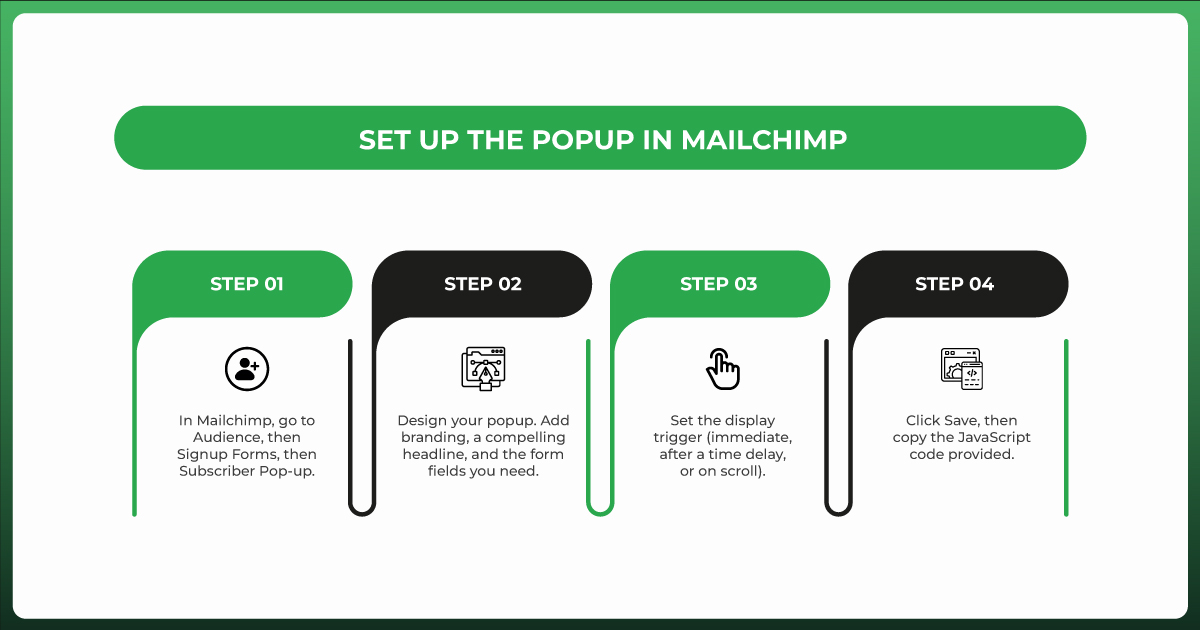
1. In Mailchimp, go to Audience, then Signup Forms, then Subscriber Pop-up.
2. Design your popup. Add branding, a compelling headline, and the form fields you need.
3. Set the display trigger (immediate, after a time delay, or on scroll).
4. Click Save, then copy the JavaScript code provided.
Add the Popup Code to Your Wix Website
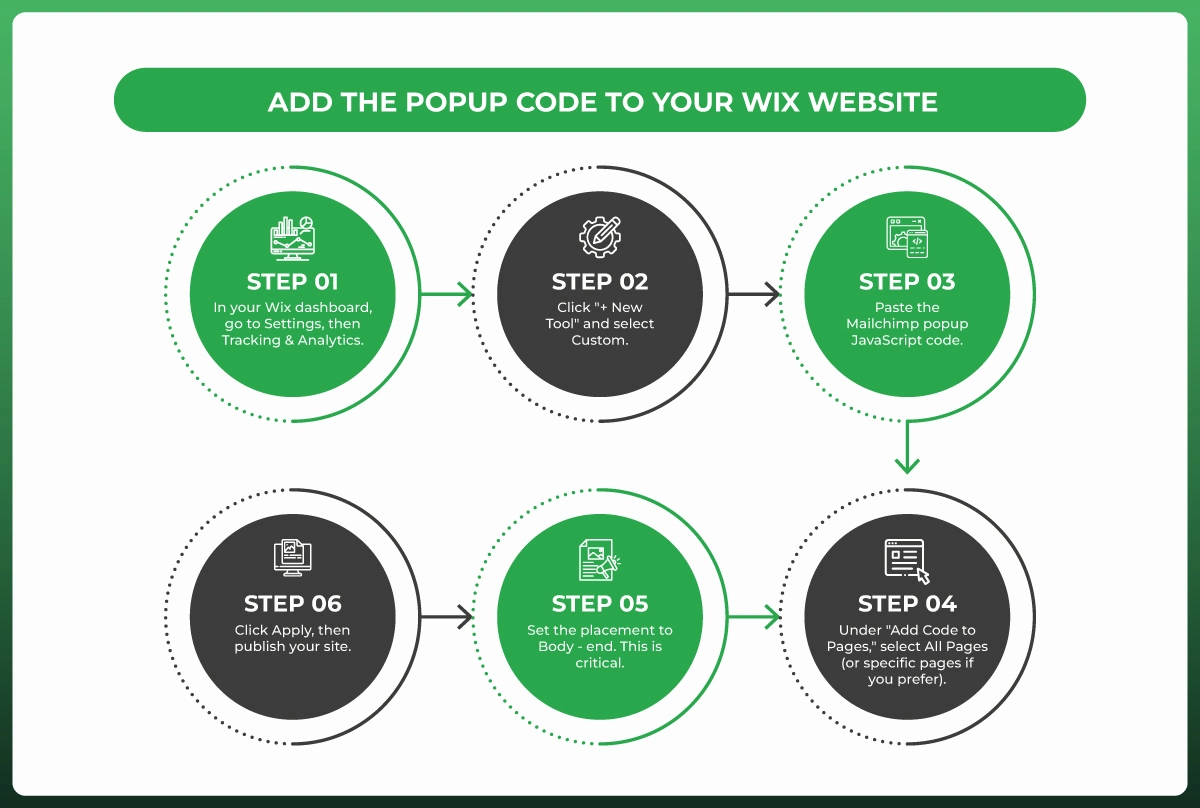
1. In your Wix dashboard, go to Settings, then Tracking & Analytics.
2. Click "+ New Tool" and select Custom.
3. Paste the Mailchimp popup JavaScript code.
4. Under "Add Code to Pages," select All Pages (or specific pages if you prefer).
5. Set the placement to Body - end. This is critical.
6. Click Apply, then publish your site.
Important: For Mailchimp popup scripts, Body - end is the generally recommended placement. Placing popup code in the Head section has been reported to break site layouts on Wix. Follow the placement Mailchimp specifies for your generated script.
Troubleshoot Popup Display Issues
Popup only shows once?
Mailchimp sets a cookie after the first display. Clear your browser cookies or test in incognito mode to see it again. This is normal behavior, not a bug.
Popup not appearing at all?
Double-check that the code is placed in Tracking & Analytics under Body - end, not in an HTML embed element. Also verify all script source URLs in the snippet use https://. If the popup still does not load, open your browser console (F12) and look for JavaScript errors that point to the Mailchimp script.
Confirmation emails not sending?
Check your Mailchimp audience settings. Go to Audience, then Settings, then Audience name and defaults, and verify whether double opt-in is enabled. If it is, the confirmation email may be landing in your test recipient's spam folder.
How to Add Mailchimp to Wix Using App Market Apps
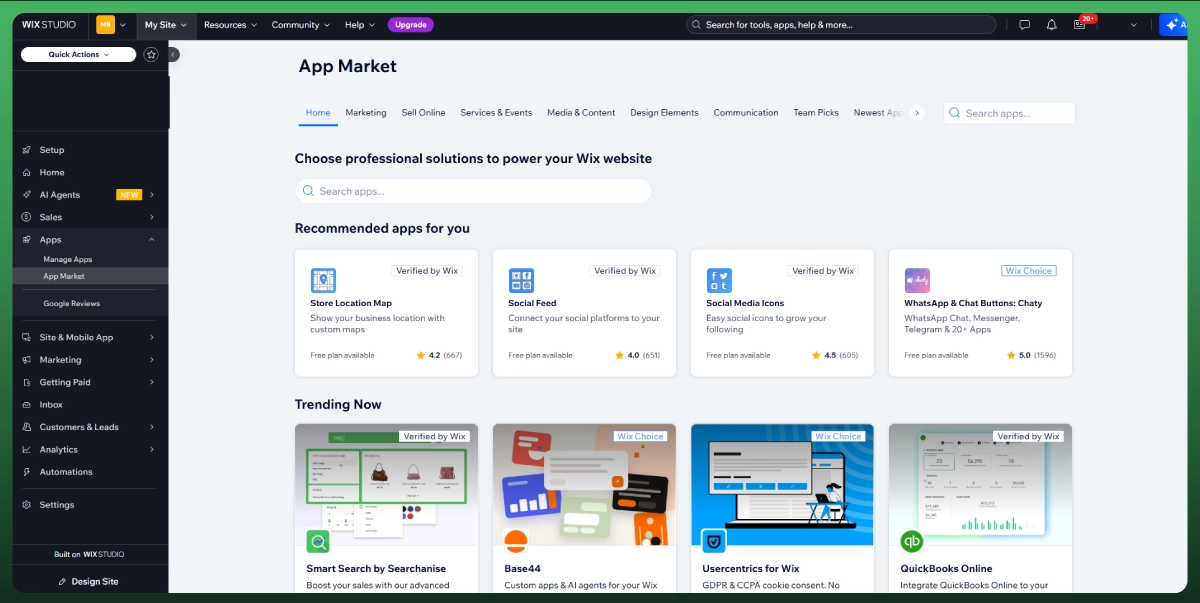
Wix removed its older native Mailchimp integration to promote its own email marketing features. But you can still connect through third-party apps in the Wix App Market. This is a solid no-code automation option if you want a simpler setup.
The two most reliable apps available right now:
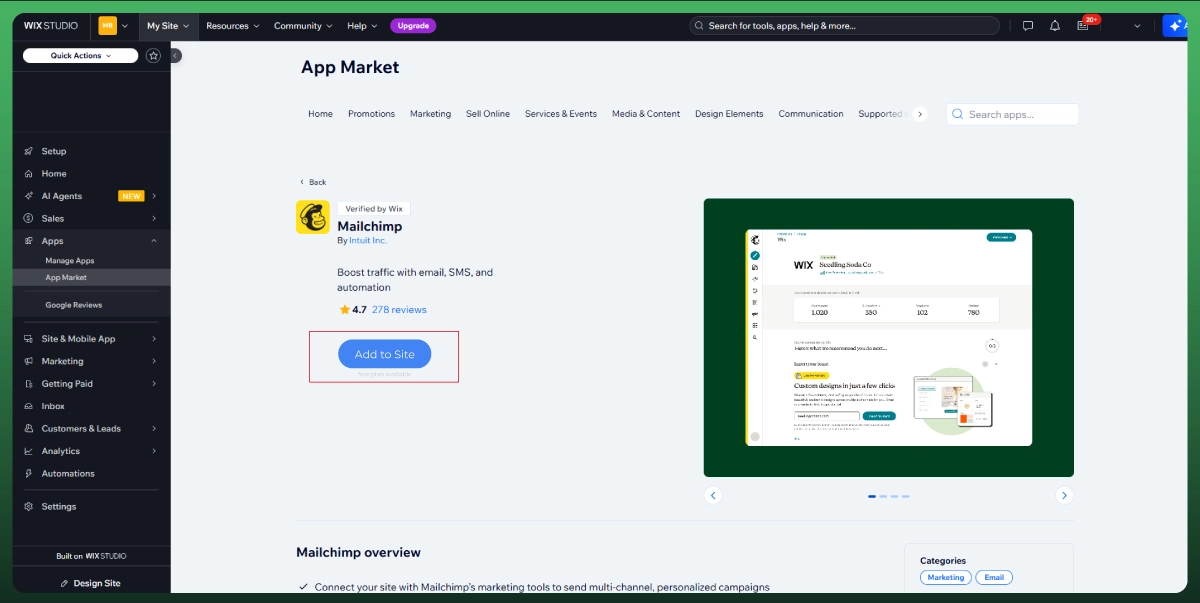
Mailchimp Email Marketing PoCo: Syncs your Wix contacts, e-commerce data, and new customers with Mailchimp. Supports automation workflows, contact collection, and campaign tracking from your Wix dashboard. Check the app listing for current pricing and plan requirements.
Mailchimp Forms by MailMunch: Adds Mailchimp subscription forms, scroll boxes, popups, and landing pages to your Wix site. Includes a drag-and-drop builder with targeting options for specific pages or visitor segments. Check the app listing for current pricing and plan requirements.
To install:
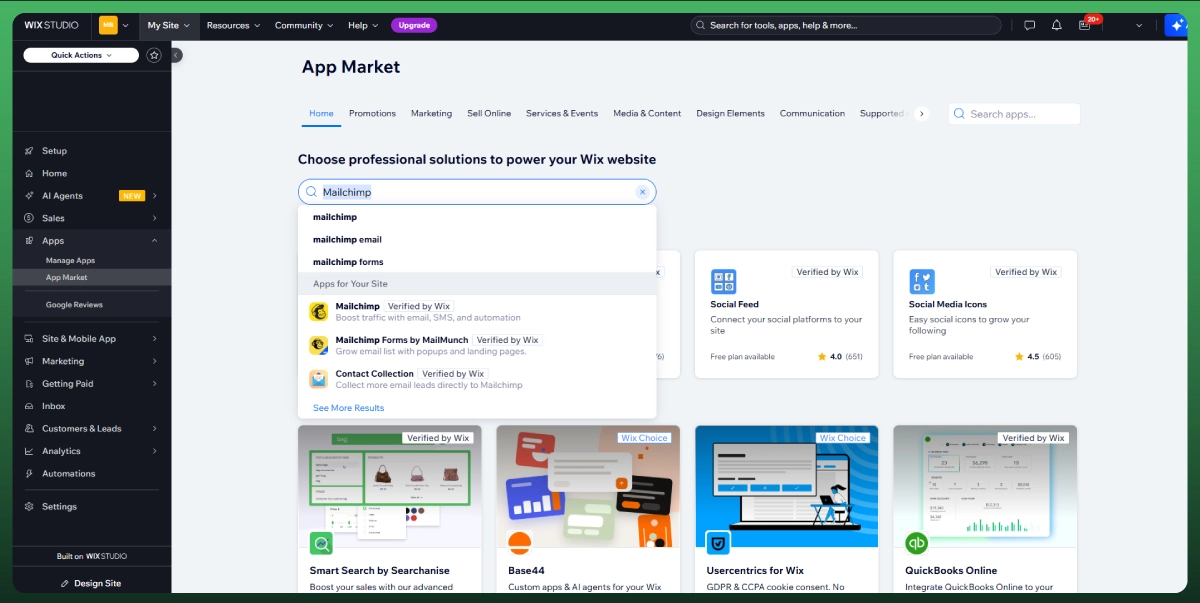
1. Open your Wix Editor and click Add Apps on the left sidebar.
2. Search for "Mailchimp."
3. Select the app and click Add to Site.
4. Grant the requested permissions and follow the in-app setup to connect your Mailchimp account.
These apps handle the integration layer for you, so you don't need to touch any HTML code or manage API keys manually.
How to Set Up Opt-In in Wix Using Mailchimp
Getting new subscribers is one thing. Getting them the right way directly affects your deliverability rate, campaign efficiency, and legal compliance.
Configure Single vs. Double Opt-In
Mailchimp supports both single and double opt-in for new subscribers.
Single opt-in adds subscribers to your Mailchimp list the moment they submit a form. It is faster but attracts more invalid email addresses and spam signups.
Double opt-in sends a confirmation email first. The subscriber clicks a verification link before being added to your list. This keeps your email list clean, reduces bounces, and improves deliverability over time.
To configure: Go to Mailchimp, then Audience, then Settings, then Audience name and defaults. Under "Form settings," toggle "Enable double opt-in" on or off. While GDPR does not specifically require double opt-in, many businesses use it as the easiest way to document subscriber consent when collecting email addresses from EU visitors.
Add GDPR-Compliant Consent Fields
If your Wix site serves international visitors, add explicit consent checkboxes to your Mailchimp forms. In Mailchimp, go to Audience, then Settings, then GDPR fields and notifications. Enable the consent fields, and they will automatically carry over when you embed the form using HTML code on your Wix site.
This way, subscribers choose what types of communication they consent to, giving you clean, permission-based contact collection.
How to Add the DNS Records Mailchimp Requires to Your Wix Website
If you send email campaigns through Mailchimp using your own domain (like hello@yourbusiness.com), you need to authenticate your domain. Without it, your emails are more likely to hit spam folders.
Why Mailchimp Needs DNS Records
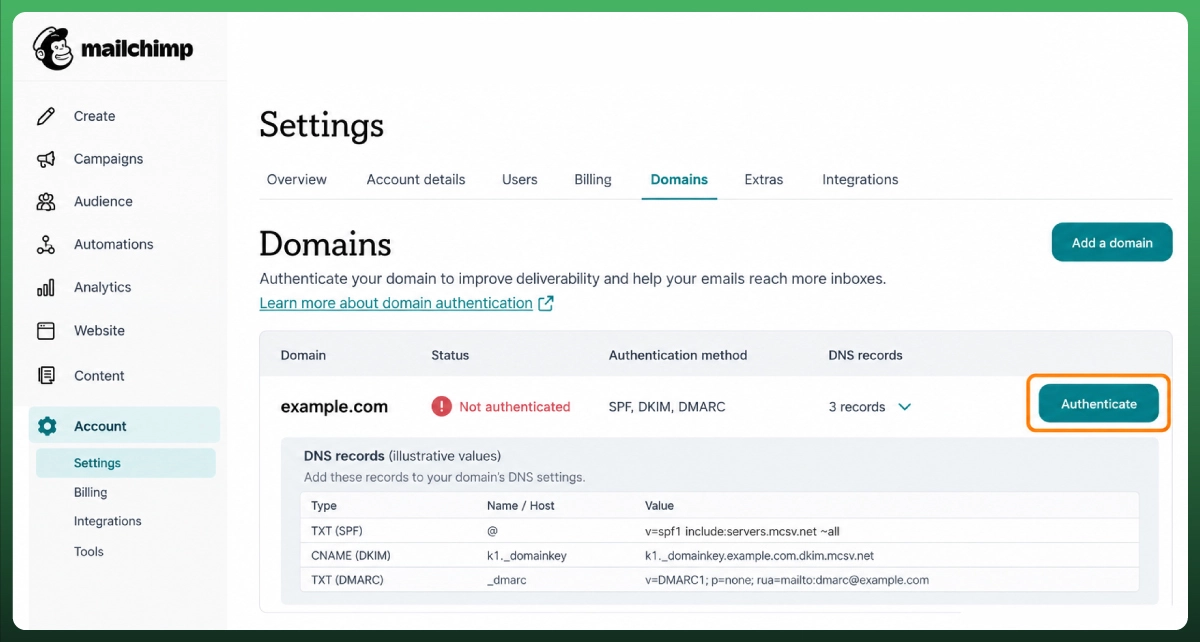
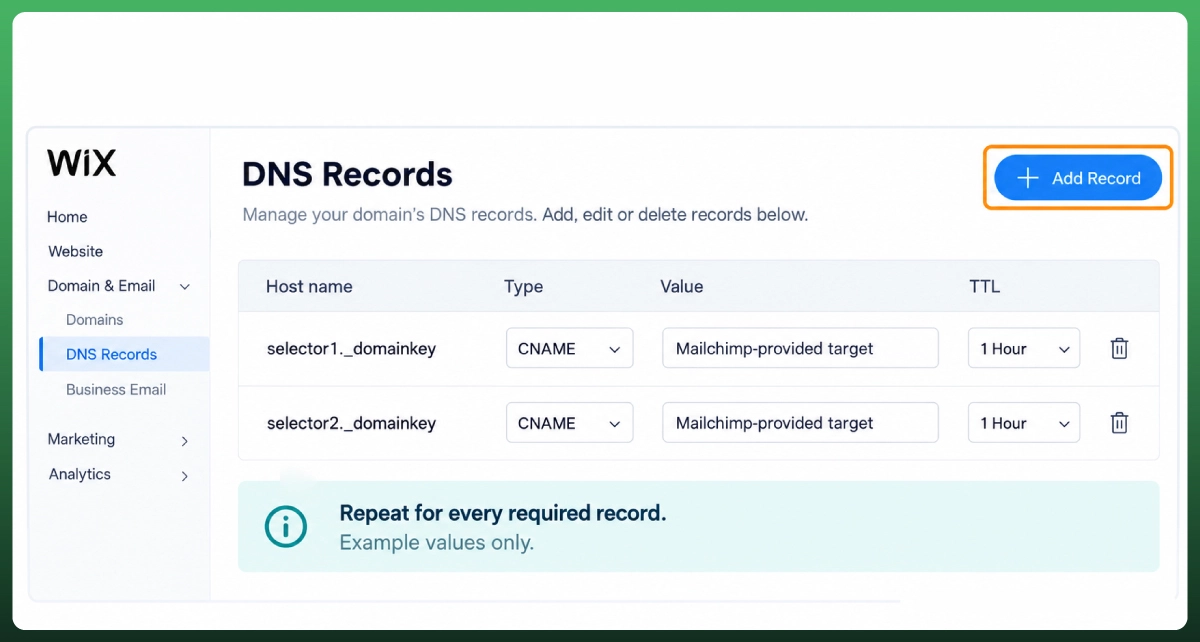
Email providers like Gmail and Yahoo verify whether an email genuinely came from the domain it claims. Mailchimp will generate the specific DNS records required for your domain, typically DKIM CNAME records. Depending on your configuration, additional verification records may also be needed. Adding these records tells email providers that Mailchimp is authorized to send on your behalf.
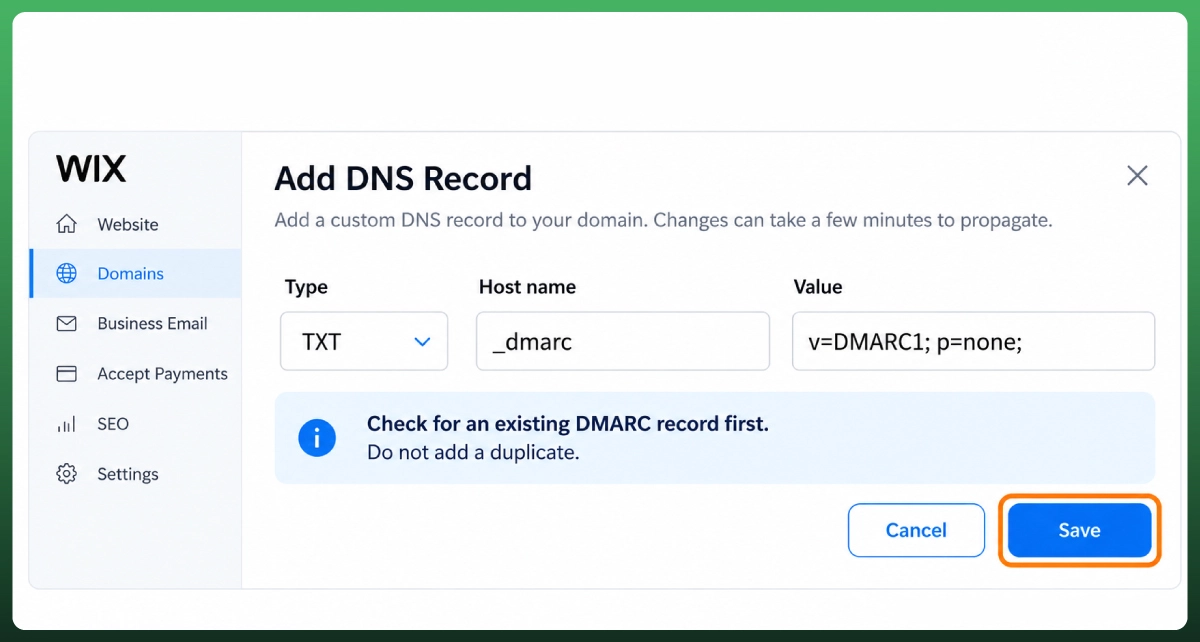
Separately, your domain should also have a DMARC policy record. DMARC is your own domain's authentication policy, not something Mailchimp generates. If you don't already have one, you will want to set up a basic DMARC TXT record as part of this process.
Google and Yahoo now require DKIM authentication for senders pushing more than 5,000 emails in 24 hours. Even below that threshold, proper authentication improves your deliverability rate and protects your sender reputation.
Add the DNS Records in Wix
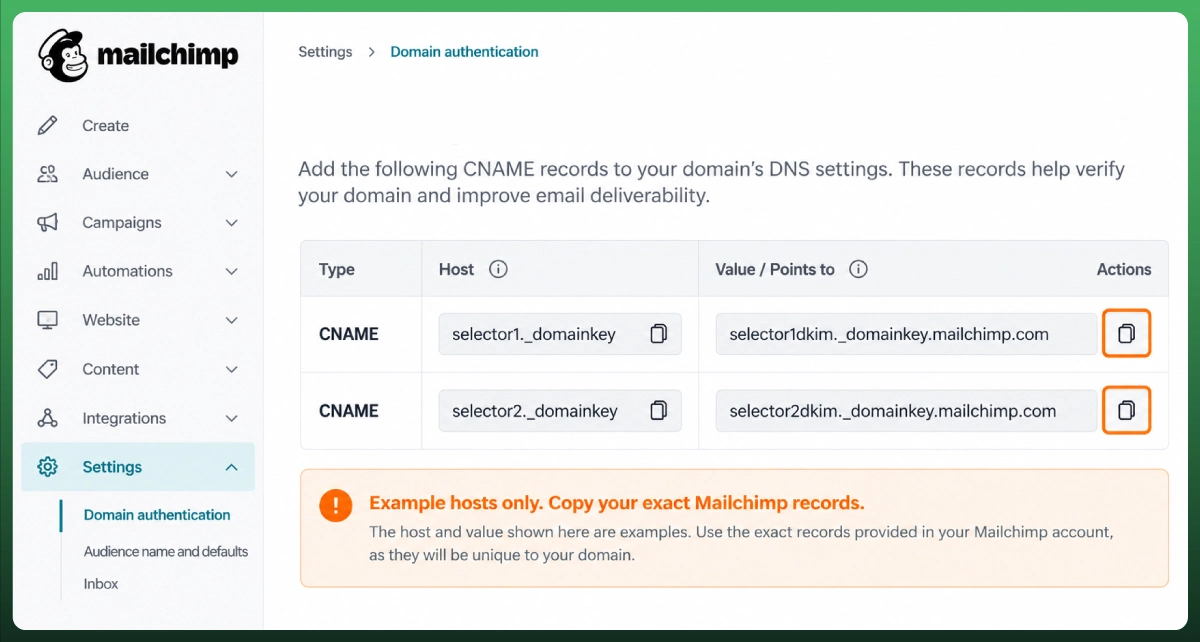
1. In Mailchimp, go to Account, then Settings, then Domains. Click Authenticate next to your domain. Mailchimp will display the required DNS records (typically two CNAME records for DKIM).
2. Copy these records.
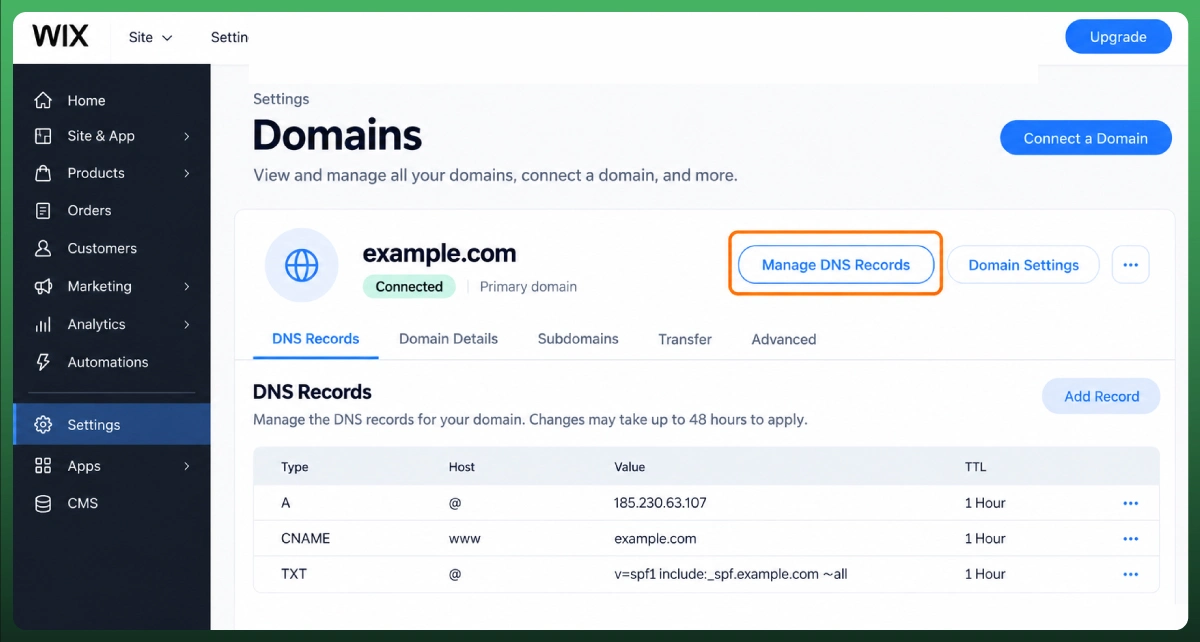
3. In Wix, go to Settings, then Domains, then Manage DNS records (next to your domain).
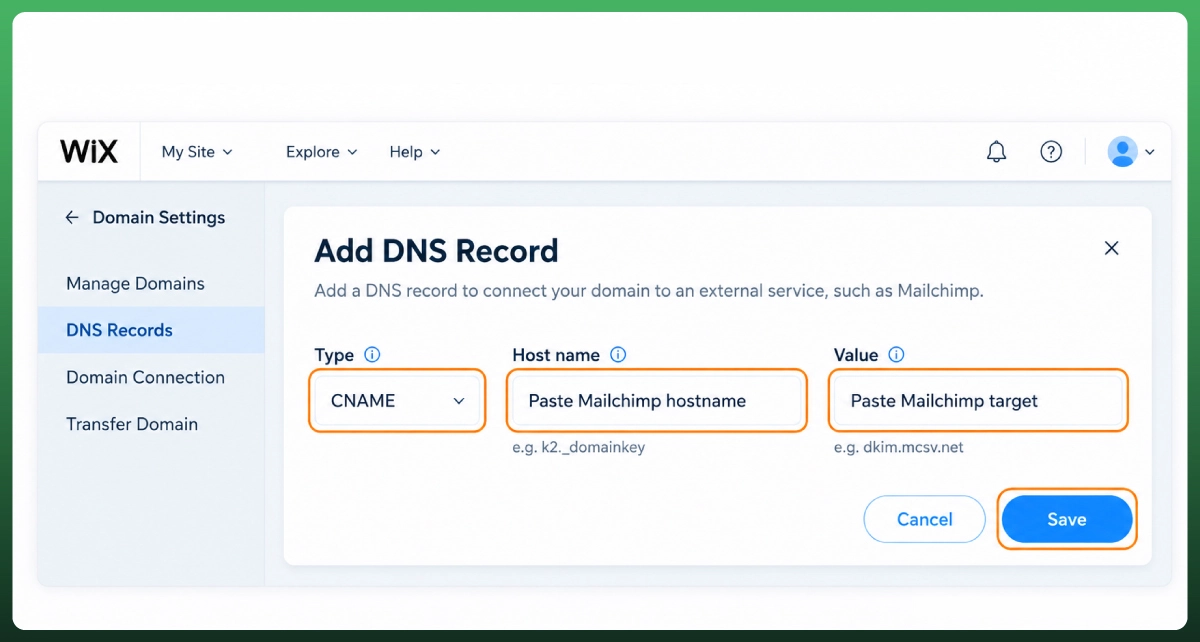
4. Click + Add Record. Select the record type Mailchimp specifies (usually CNAME), paste the hostname and value, and save.
5. Repeat for any additional records Mailchimp requires.
6. If your domain does not already have a DMARC record, add a TXT record with the host _dmarc and a basic policy like v=DMARC1; p=none; as a starting point. Save all changes.
DNS propagation can take anywhere from a few minutes to 48 hours. After waiting, return to Mailchimp and click Verify to confirm everything is active.
How to Send Wix Form Submissions to Mailchimp
This is one of the most common questions: "I already use Wix Forms on my site. How do I get those submissions into my Mailchimp list automatically?"
If you are using the official Mailchimp-for-Wix integration, new contact form submissions can sync automatically if you selected that contact type during setup. Go to your Manage Integration settings and make sure "New Contact Form Submissions" is checked under contact types.
If you are not using the official integration, your options are to use an automation platform like Make or Pabbly Connect to link Wix Form submissions to your Mailchimp audience, or to manually export your Wix contacts as a CSV and import them into Mailchimp. The manual route works for one-time migrations, but automation keeps your Mailchimp list updated without ongoing effort.
Connect Mailchimp to Wix Using the API or Wix Velo
For developers or advanced users building custom solutions, the Mailchimp Marketing API gives full control over subscriber management, audience syncing, and email campaigns. You can pair it with Wix Velo (Wix's built-in development platform) to write backend code that connects directly to Mailchimp's API endpoints.
This approach is best when you need custom form handling, conditional subscriber tagging, or syncing specific ecommerce actions that the standard integration does not support. You will need a Mailchimp API key (generated under Account, then Extras, then API keys) and working knowledge of JavaScript for Velo's backend modules.
For most site owners and non-developers, the methods covered earlier in this guide will be more practical. The API route is specifically for custom builds where standard integrations fall short.
Common Mailchimp and Wix Integration Issues (and Fixes)
Even with a clean setup, things can go wrong. Here are the issues we see most often and how to resolve them.
Contacts not syncing: Check your sync settings in Mailchimp under Integrations, then Wix, then Manage Integration. Verify the correct contact types are selected. Also confirm your Mailchimp plan has not hit its contact limit.
Embedded form not showing: Make sure you used the Embed HTML element in Wix, not a regular text box. The form will not render in preview mode. You must publish the site first.
Popup breaking the site: This commonly happens when the popup JavaScript is placed in the Head section of Tracking & Analytics. Move it to Body - end and ensure all script URLs use https://. Test in incognito mode after publishing.
Duplicate contacts: Mailchimp deduplicates by email address within the same audience. Duplicates usually happen when contacts exist across multiple Mailchimp audiences. If you notice duplicates, check whether your integration is syncing to the correct audience. Use Mailchimp's cleanup tool (Audience, then All contacts, then Clean up contacts) to review.
Emails going to spam: Authenticate your domain with the DNS records covered earlier. Also avoid using free email addresses (like @gmail.com) as your "From" address in Mailchimp. Use your business domain instead.
Dashboard showing stale data: Sometimes the analytics dashboard does not refresh immediately after a sync. Wait 15 to 30 minutes and check again. If the issue persists, disconnect and reconnect the integration from the Manage Integration page. To disconnect, click Manage App, then Disconnect site, type DELETE, and confirm.
In Fine: What You Can Do After Connecting Mailchimp to Wix
Once your Mailchimp and Wix integration is live, you unlock the full power of Mailchimp as an email marketing and automation platform. Here is a quick overview of what becomes possible.
Set up automated workflows for welcome emails, abandoned cart emails, and automated reminders based on site interaction. Use Mailchimp's marketing CRM to track customer lifetime value and segment audiences for personalized campaigns. Create campaign drafts using AI tools like Intuit Assist for faster content creation. Run A/B testing on subject lines, send times, and content to boost campaign performance. Use the analytics dashboard for custom reports on campaign efficiency and site performance.
Mailchimp also supports product recommendations for Wix e-commerce stores, behavioral targeting based on purchase history, and AI-driven automation that adapts to how subscribers interact with your emails.
The official Mailchimp-for-Wix connection is free to set up. However, Mailchimp's own pricing depends on your contact count and plan tier. Third-party Wix App Market apps (like Mailchimp Email Marketing PoCo or Mailchimp Forms by MailMunch) may have their own pricing tiers or require a paid Wix plan for full functionality.
Can I use Mailchimp with a free Wix site?
Yes. You can embed Mailchimp signup forms using HTML code on a free Wix site. The Wix App Market itself is accessible on free plans, but some Mailchimp integration apps may require their own paid subscription or a premium Wix plan for full features.
Does Mailchimp sync Wix e-commerce order data?
Yes, when using the official integration with a Wix e-commerce site. Purchase history, order values, and customer details sync to Mailchimp. This enables features like abandoned cart emails, product recommendations, and customer lifetime value segmentation.
How do I add a Mailchimp subscribe form to a specific Wix page?
Use the embedded form method. Place the Embed HTML element only on the page where you want the form. The popup method shows on all pages by default, but apps like MailMunch let you target specific pages.
Can I add Mailchimp popups to Wix, WordPress, and Squarespace at the same time?
Yes. The Mailchimp popup code works across any website builder that supports custom JavaScript. The process differs slightly per platform (Tracking & Analytics in Wix, header scripts in WordPress, code injection in Squarespace), but the Mailchimp-side setup is the same.
What happens to my contacts if I disconnect Mailchimp from Wix?
Disconnecting stops the data sync. According to Mailchimp's documentation, Wix-synced data is deleted from your Mailchimp account upon disconnection, though your Wix site data remains untouched. Contacts added to Mailchimp through other sources are not affected. It is good practice to export your audience before disconnecting, just in case.
What is the difference between Wix Forms and Mailchimp Forms?
Wix Forms (including Wix CMS forms) store submissions in your Wix dashboard. Mailchimp Forms send data directly to your Mailchimp list. If you use a Wix Form for contact collection and want that data in Mailchimp, you will need a third-party connector or manual CSV export.
Need Help With Your Wix Website?
Get Expert Wix Design & Development Services From Ecomgiantz.
Ecomgiantz Team consists of our in-house experts who share their hands-on experience in ecommerce businesses, websites, marketplaces, etc. We also share the latest updates, insights, and market trends that can be helpful for your online business.